UPS Integration
Overview
![]() Linnworks can directly integrate with UPS to allow the printing of shipping labels.The following document describes the proicess of setting up and integrating UPS and UPS services in Linnworks. UPS labels can be automatically sent to a thermal printer, printed directly onto an invoice or sent to PDF.
Linnworks can directly integrate with UPS to allow the printing of shipping labels.The following document describes the proicess of setting up and integrating UPS and UPS services in Linnworks. UPS labels can be automatically sent to a thermal printer, printed directly onto an invoice or sent to PDF.
Creating a UPS Account
- Access the UPS.com web site at http://www.ups.com and click the "Login" link in the upper right hand corner of the page.
- Click on the "Register" link.
- Follow the prompts to complete the registration process.
Adding UPS account number to UPS.com Profile
- Log in to the UPS.com site (http://www.ups.com) using your UPS.com user ID and password.
- Click the "Manage My UPS" link on the "My UPS" tab.
- Click on the "Account Summary" link.
- Click on the "Add a UPS Account" link and follow the instructions to add your UPS account number to your My UPS profile.
Note: As part of this process you may be asked to enter the following information which is located on one of your last three Delivery Service Invoices or an International Package Services Invoice received within the last 45 days:
- Invoice Number
- Charges/Amount Due This Period
- Invoice Date
- Control ID
Requesting UPS Developers Kit Access Key
- Browse to https://www.ups.com/upsdeveloperkit.
- Click on the "Request an access key" link inside the "How to Get Started" section.
- In the "My UPS" box, enter your User ID and password then click on the [Log In] button.
- Complete the "Secondary Contact Information" and the click on [Request Access Key].
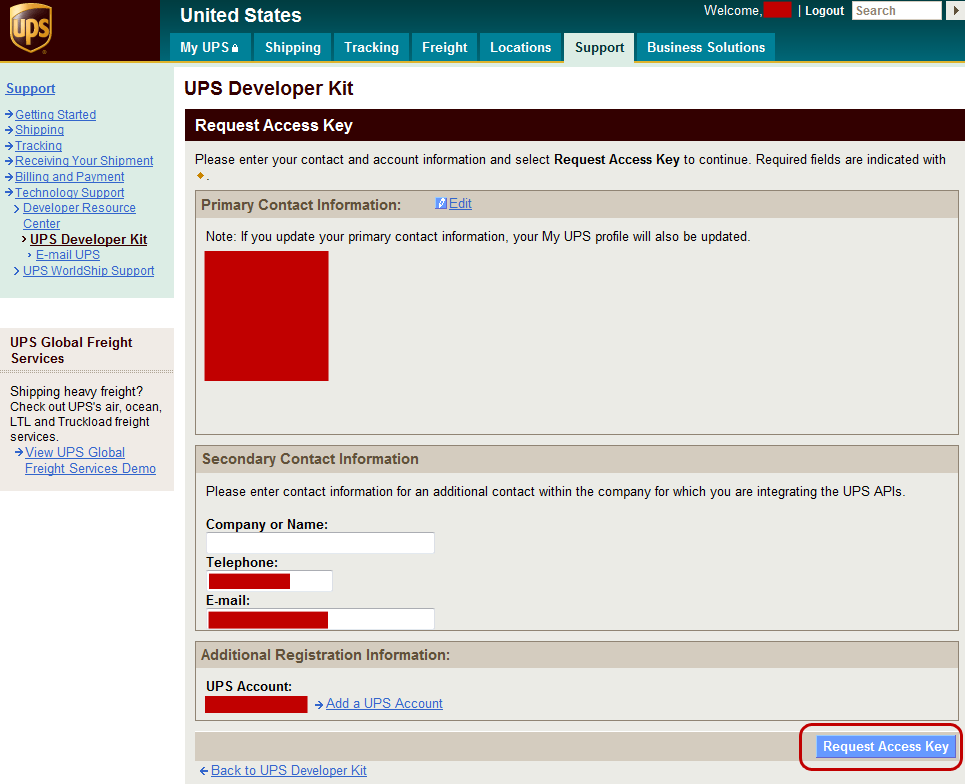
UPS will then send you your Access Key Details.
Enabling UPS Integration in Linnworks
1 Integration
|
Fig 1.1  |
2 API Key
Note: For the UK
The shipper postcode must be the postcode without spaces, eg PO198DJ State/Reigon must be the code, NOT the full name, eg SXW not West Sussex http://www.genuki.org.uk/big/Regions/Codes.html |
Fig 2.1  |
3. Press Test Login
|
|
4. Verification Process
|
Adding Postal Services
There are two methods for adding services to UPS.
1. Click Add and select the service from the list, these services are pre-existing services in linnworks, then select the service it maps to. Next select if the service allows for Splittable packaging, se the declare value and if an Intenational Form is required.
2. Create Default list: This is the suggested method as it will create all methods relevent to you and assign the relative services.
Columns
|
Label Printing Settings
UPS labels can be printed in three ways; to PDF (1 or two labels per sheet), send directly to a printer or printed directly onto an invoice.
Printing to PDF
To print to pdf, open the UPS configuration and select PDF from the Label Settings.
Click on the sheet icon to switch between 1 per sheet and 2 per sheet.
Send to Printer
To print directly to a printer, open the UPS configuration and select Send to Printer from the Label Setting.
- Select the printer, the the paper size.
- If your printer requires margins set the margins in the margins boxes.
- Next select the scale, normally this would be 100%.
- Finally select the orientation either Portrait or Landscape
Printing Directly onto an Invoice
For information on printing labels directly onto an invoice see: Template Designer - Printing Shipping Labels on to Invoices documentation
Printing a Label in Open Orders
If an order is allocated to a postal service which is mapped to a UPS service – the system will automatically send the Shipment request to UPS, generate a label and record a tracking number (or multiple tracking number in case of split order package).
Note: there are multiple ways an order can be allocated to the postage service in Linnworks – macro allocation, downloading postage service from the channel directly, manual editing of the order or selecting the service at the time of printing the label (in Process Order screen). Screenshot below shows the allocation by editing the order manually.

To print label from the Open Order screen - select the orders you would like to print (you can select multiple orders in one batch). Right click > Print > Print Label
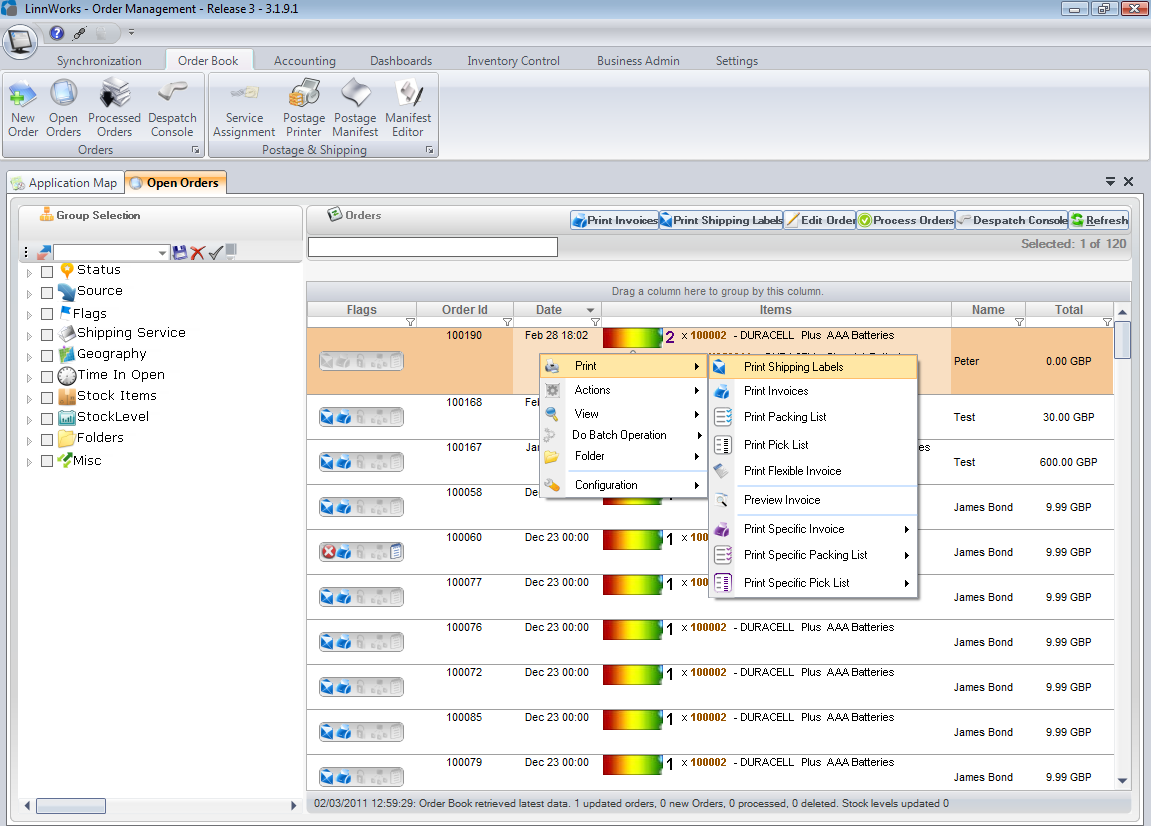
Linnworks will either generate a PDF file with all labels merged in one document or will directly send the label to the printer, depending on setup.
If a label printing resulted in error you will see an error sign next to the order. Move the mouse over the error icon to see the error message

All the tracking numbers for the shipment will be recorded against the order. You can view it in View Order card (among many other places)
Splitting packages
If the service you allocated to the order is configured as “Splittable” and an order contains more than one item, Linnworks will prompt you to split an order packaging at the point of printing.
Click on the Split cell to bring up the order packaging splitting screen.
To split the order drag and drop the order items from the grid onto the space provided at the bottom.
Dragging onto a empty space will create new "Bin". Dragging onto existing "Bin" will result in adding the dragged item into the selected bin.
To drag only certain number of items into a bin, specify how many items you would like to add in the Move Quantity field before dragging the item.
International Shipments considerations
Some UPS International services including those to some European destinations must, were necessary, have, weight, dimensions and content of each package clearly specified. The actual requirements will depend on service, destination country and contract type (e.g. volumetric) – Full details are available from UPS.
In order to successfully print International labels the following minimum conditions must be met for each interntional label:
- The order must have weight. Ideally each order item must have weight specified in Linnworks.
- The packaging must be selected
- Each order item cost must be specified in the order (0 order items will result in error, unless this is a resend in which case Linnworks will set the order item value to 0.0001)
- In case of split order packaging, each package must have weight, dimensions and a number of items in the package.