eBay configurator
Videos for this articleOverview
Configurator hosts common details of a listing such as listing type, duration of the listing, return policy, payments method, shipping info, which categories the listing will be submitted to etc. From the eBay Configurators screen it is possible to add, edit, delete and duplicate configurators.
Prerequisites
eBay channel must be integrated in Linnworks.
Quick Guide
- 1. Create a new configurator
- 2. Define configurator's general settings
- 3. Specify returns policy
- 4. Add accepted payments methods
- 5. Specify shipping policy
- 6. Select eBay categories and item condition
- 7. Select eBay specifications
- 8. Add attributes for variations (only for variation products)
- 9. Select Store categories (only for eBay store owners)
- 10. Fill HTML template for listings (optional)
- 11. Save configurator
- 12. Revise configurator (if required)
- 13. Duplicate configurator (if required)
Detailed Guide
1.Create a New Configurator
|
1.1 Configs -> eBay Configurators; 1.2 Click Add New button to create a new configurator. It will appear at the bottom and will have a standard name New Ebay Configurator(0). 1.3 Double-click on the Title to change the default name of the configurator. |
2. Define Configurator's General Settings
|
2.1 Click the button in the Main column; 2.2 Select the required eBay account from the eBay account drop-down box; 2.3 Select the required site from the Site drop-down box; 2.4 Select listing type from the Listing type drop-down box; 2.5 Select currency that will be used in the listings from the Currency drop-down box; 2.6 Select listing duration from the Duration drop-down box; 2.7 Tick Include VAT box (if applicable) and enter the VAT rate; 2.8 (Optional) Tick International site visibility box to make listings visible at UK, US and Canada sites for additional fee. Click here for more information; 2.9 (Optional) Tick Create private listings box for buyers' identities to remain anonymous. Click here for more information; 2.10 (Optional) Tick Use tax table box, if there is a tax table set up in a given eBay account that has to be used when applying and calculating sales tax for an order line item. 2.11 (Optional) Tick Enable best offer box for Best Offer option to be used when listing items with a fixed price for sale. With Best Offer, you give buyers a chance to negotiate the price with you. Click here for more information. Accept Price and Decline Price for Best Offer listings need to be entered manually in each individual listing template, however Best Offer will also work without Accept Price and Decline Price; 2.12 Enter a number in Max quantity box to specify maximum available quantity for each item. More info on how Max Qty in LinnLive works can be found here; 2.13 (Optional) Enter a number in Min quantity to specify available quantity that will be visible in your listing. If stock level is less than the specified min quantity, then min quantity will be sent to the channel. Min quantity is the quantity that LinnLive will send to eBay during listing creation, update and revision. However, if Linnworks is syncing stock levels for the given channel, min qty set in LinnLive will not affect levels sent by Linnworks. This also means that Linnworks will end your listing regardless of the min qty selected in LinnLive, if End Listings is ticked in Linnworks eBay config. Additional options (optional): 2.14 Tick Send profit to charity to donate a percentage of your profit to charity; a) Click the button against Charity organisation ID to select the required ID from the list; b) Enter a number in Charity donation percent box to specify a donation percentage; 2.15 Tick Max quantity per buyer box to restrict the quantity of items that may be purchased by one buyer during the duration of a fixed-price listing; 2.16 Tick Global shipping program box, if your eBay account is eligible for Global Shipping Program. More information can be found here for US merchants and here for UK merchants; 2.17 Form the Photo Display drop-down box select Supersize, if you want to use this option (for additional fee); 2.18 Tick Sold on eBay (available only for eBay UK and eBay DE), if you have got a permission from eBay to create listings with strike-through pricing ("original" price of the item is shown in a strike through font, current discounted item price is shown in a non-strike through font). This option works in combination with the extended property for RRP. More information can be found here. 2.19 Tick Auto Select images on eBay to have all uploaded images auto-selected when submitting listings using the configurator. |
3. Specify Returns Policy
|
3.1 Click Returns button; 3.2 From the Returns accepted drop-down box select whether you accept returns or not; 3.3 From the Refund drop-down box select refund type; 3.4 From the Return paid by select who pays for return shipping; 3.5 From Return within drop-down box select time limit buyers have to return the item after they receive it; 3.6 From the Restocking fee drop-down box (available for US only) select restocking fee (if any) charged by the seller for returned items; 3.7 In Return policy field enter return policy; 3.8 In Additional checkout instructions field enter information that will be displayed to the buyers during the checkout process. |
4. Add Accepted Payments Methods
|
4.1 Click Payments button; 4.2 Tick box against payment methods you accept; 4.3 Tick Is immediate payment required box, if you require immediate payment. More information can be found here; 4.4. Tick In-Store Pickup box to enable this option on eBay. This will only work for sellers that have permission from eBay to offer such option; 4.5 Tick Click and Collect box to enable this option on eBay. This will only work for sellers that have permission from eBay to offer such option. When enabled, product's weight and dimensions are submitted to eBay. |
5. Specify Shipping Policy
|
5.1 Click Shipping button; 5.2 From the Product location drop-down box select the country to specify item location; 5.3 Enter State/City in the State/City field; 5.4 Enter postal code in the Postal Code field; 5.5 From the Rate drop-down box select shipping rate; 5.6 From the Package Type drop-down menu select the package type (option available only for Calculated shipping); 5.7 From Max dispatch time drop-down box select the number of days it will take to post the item after receiving cleared payment; 5.8 From the Extended property for Max dispatch time drop-down box select extended property for max dispatch time, if such has been added to inventory items. Property value has to be a positive number. Typical values are 0, 1, 2, 3, 4, 5, 10, 15, or 20, but this can vary by site. In case of invalid value, eBay will return an error. And if there is no property or property value is non-numerical, default configurator's value will be used. Max dispatch time value is being updated on eBay each time a listing is updated; 5.9 Enter domestic details: a) Tick Promotional shipping discount offered box, if you have a shipping discount profile set up on eBay; b) Tick Shipping rate table enabled box, if there is a shipping rate table created in your eBay account; c) If there are Shipping discount profiles set up in your eBay account, click ID button against the Shipping discount profile ID to view the list of the profile IDs. Map the Extended property for profile ID with the shipping discount profile ID or select a default profile ID from the list to specify shipping costs for the items listed using this configurator; d) In Handling price for calculated shippings enter handling cost (active only for Calculated shipping); e) Select free shipping service from the Free shipping service drop-down box; 5.10 Enter international details (for sellers shipping internationally): a) Tick Promotional shipping discount offered box, if you have a shipping discount profile set up on eBay; b) Tick Shipping rate table enabled box, if there is a shipping rate table created in your eBay account; c) Click ID button next to Shipping discount profile to view the list of the profile IDs, if there are shipping discount profiles set up in your eBay account. Map the Extended property for profile ID with shipping discount profile ID or select a default profile ID from the list to specify shipping costs for the item listed using this configurator; d) Click button against the Shipping locations to select locations you are willing to ship to (Fig 5.1); e) Click button against the Excluded shipping locations to select locations you do not ship to; 5.11 Click Add Shipping Service button to add shipping service to the list; 5.12 Select from the Shipping Service drop-down box shipping service you offer (Fig 5.2); 5.13 In the Price Default Value column specify default price for the selected shipping service; 5.14 If an extended property was used to specify price for the selected shipping service, select the extended property from the Extended Property column to map it (Fig 5.3); 5.15 In the Additional Price Default Value column specify default cost for each additional item; 5.16 If an extended property was used to specify cost for additional item, select the extended property from the Extended Property column to map it; 5.17 Repeat steps 5.10 through 5.14 to add other shipping services you offer; 5.18 Tick Extended rules for shipping services to use weight or association rules. More information can be found here; The next steps are for sellers offering international shipping:5.19 Select from the Shipping Service drop-down box international shipping service; 5.20 Repeat steps 5.11 through 5.14 for selected international shipping service; 5.21 Click button in the Shipping locations column; 5.22 Select countries and regions you are willing to ship to using the chosen shipping method. |
Fig 5.1 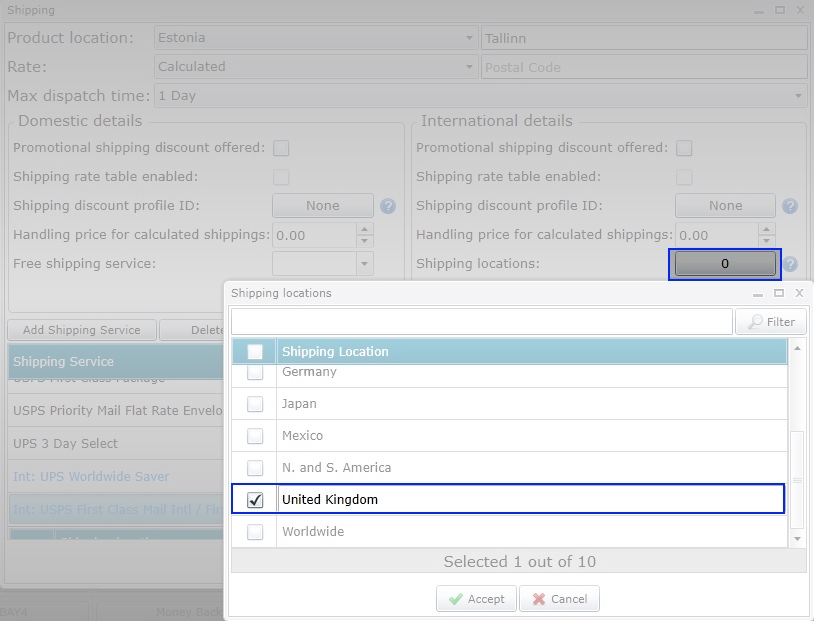 Fig 5.2 Fig 5.2 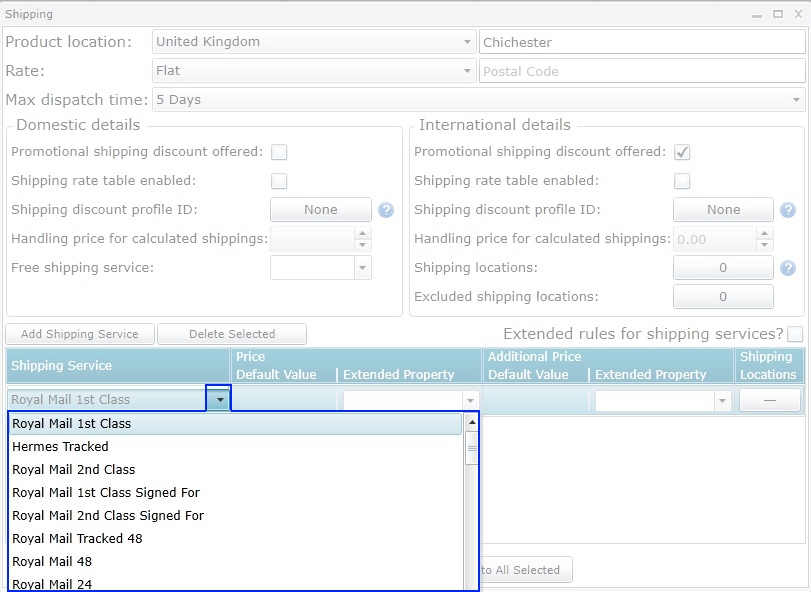 Fig 5.3 Fig 5.3 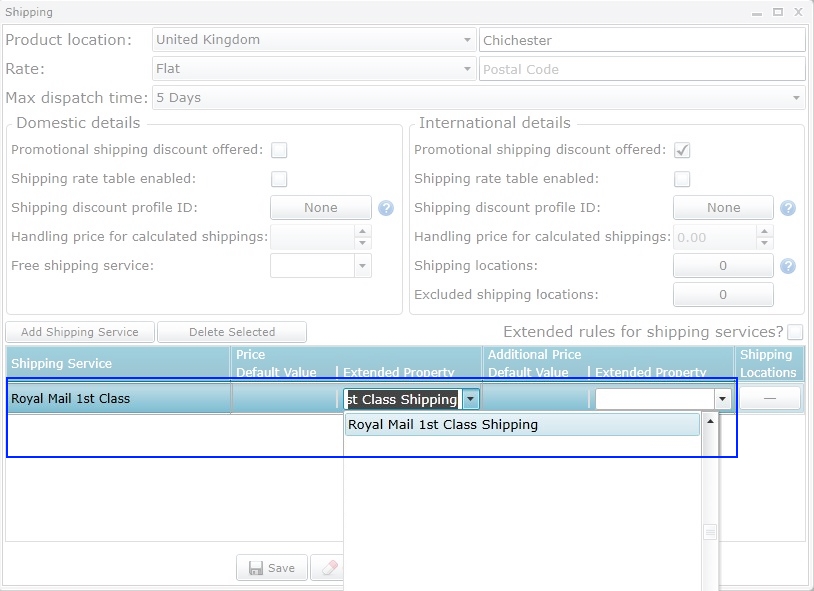 |
6. Select eBay Categories
|
6.1 Click button in the Categories column; 6.2 Use search field or scroll through the list to find the required categories; 6.3 Add the categories (max 500 categories per a configurator) that will be used when listing using this configurator by clicking the green '+' button (Fig 6.1); 6.4 Tick Default box against the chosen category to set the category as default for items that do not have an extended property for eBay category assigned to them; 6.5 Select Only primary category in the Option for default categories field, if there is an extended property for eBay category added to Inventory Items; 6.6 In the Extended property for primary category drop-down box select the extended property for eBay category added to inventory items (Fig 6.2); 6.7 Select Both primary and secondary categories in the Option for default categories field, if there are extended properties for two eBay categories assigned to inventory items to list items in 2 eBay categories (Fig 6.3); 6.8 In the Extended property for secondary category drop-down box select the extended property for 2nd eBay category added to Inventory Items; 6.9 Tick Is catalog product box to enable listing with eBay catalogue in case items exist in eBay catalog. In this case system will only create a new listing for items whose barcode does not yet exist in eBay catalog. Click here for more information; 6.10 Tick Use suggested category box to let the system find the best category to list items in. Click here for more information. |
Fig 6.1 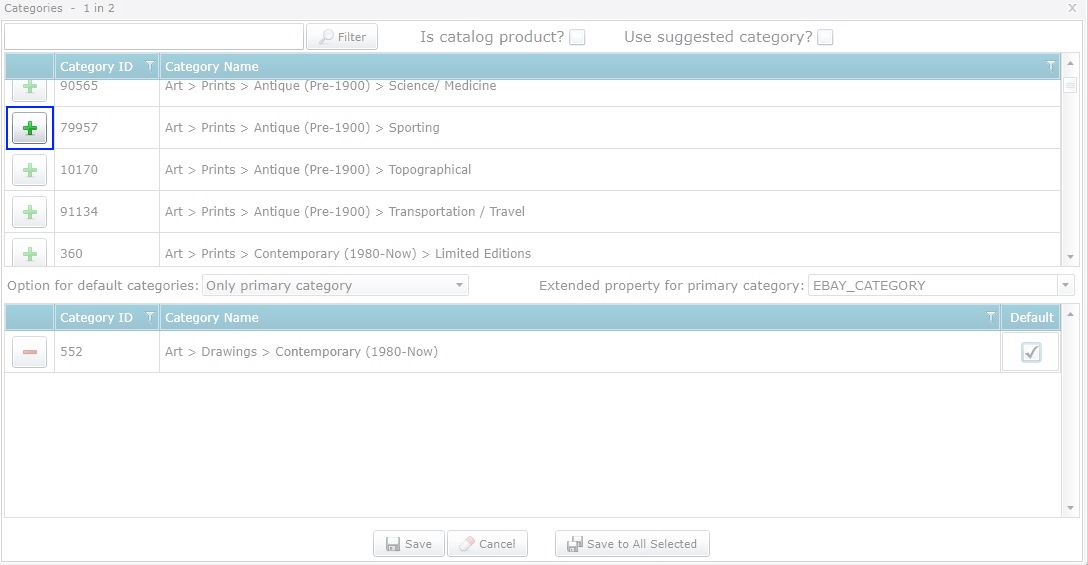 Fig 6.2 Fig 6.2  Fig 6.3 Fig 6.3 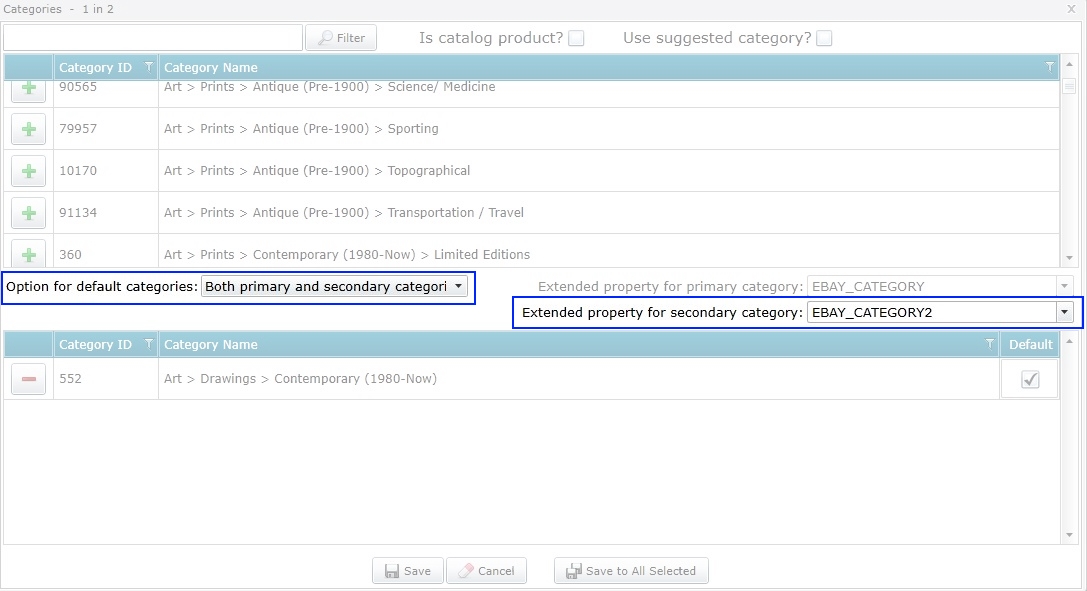 |
7. Select eBay Specifications and Condition
Each category on eBay has a list of item specifics. The item specifics are optional fields for listings. Here you can specify which item specifications you want to show in your listing (if any) and select item condition as well as add additional details about the item's condition. Note that from the mentioned attributes only item condition is mandatory.
|
7.1 Click Download Specifications for Default Categories button to retrieve the list of specifications and item conditions for categories that are selected as Default in the Categories section for a given configurator (Fig 7.1); 7.2 Click Download Specification for All Categories button to retrieve the list of specifications and item conditions for all categories selected in the Categories section for a given configurator; 7.3 Select condition from the Item condition drop-down box to be used as default. This condition will be used, if there is no extended property for condition of inventory items (Fig 7.2); 7.4 Click Add New Specification button to add a new specification; 7.5 Type in the name for the specification as it will appear on eBay; 7.6 If there is an extended property on inventory items for the specification, select it from the Extended Property column to map; 7.7 Enter a value in the Default Value column that will be used in the listing when there is no extended property for specification assigned to an inventory item (Fig 7.3); 7.8 In the Extended property for condition drop-down box select the extended property for condition assigned to inventory items; 7.9 If you are selling items that are not new, it is possible to specify their condition by adding extended property with additional details about the item's condition to each inventory item. In the Extended property for condition note drop-down box select the extended property for additional details about the item's condition assigned to inventory items. Click here for more details; 7.10 Click Save. |
Fig 7.1 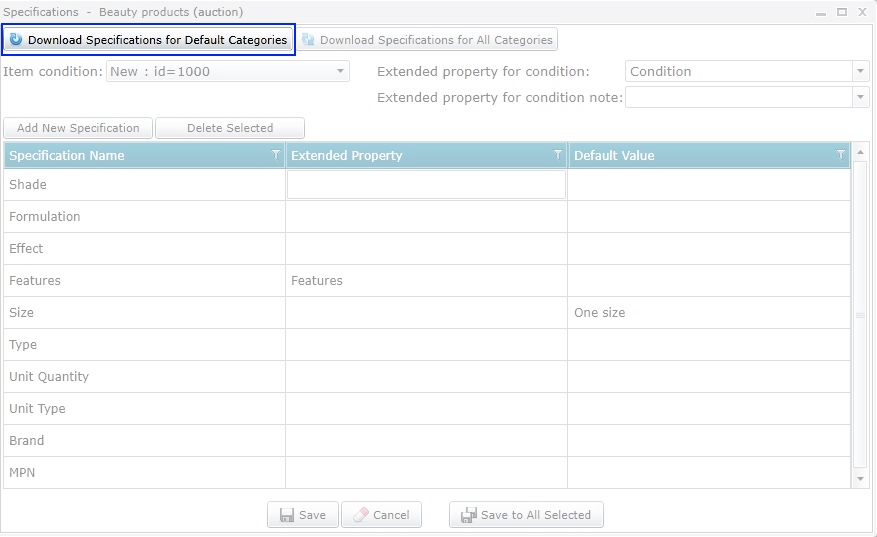 Fig 7.2 Fig 7.2 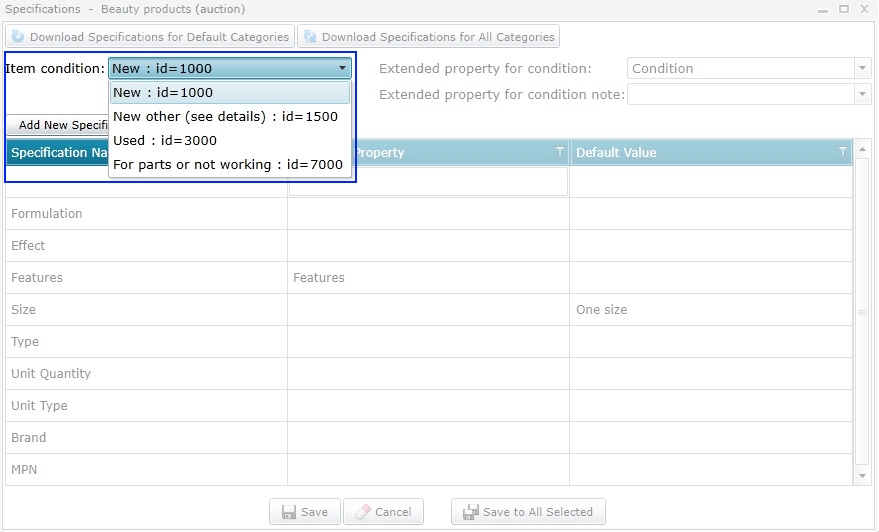 Fig 7.3 Fig 7.3  |
8. Add Attributes for Variations (Only for Variation Products)
This step is required only for listing variation products.
|
8.1 Click Add Attribute button; 8.2 Give name to the attribute as it will be displayed on eBay; 8.3 If main item of the variation group has an extended property for variation item title, map it with Extended property for variation title (Fig 8.1). Otherwise the main item's title will be used as the variation title; 8.4 Tick Don't use variation pictures (by default) box to avoid posting images of each item from the variation group (e.g. if items vary by size only); 8.5 In the Variation Attribute Name column enter a name for the variation attribute as it will be displayed on eBay; 8.6 From the Extended Property drop-down box select the extended property for variation attribute added to each item of the variation group. |
Fig 8.1  |
9. Select Store Categories (Only for eBay Store Owners);
If you have an eBay store, store category must be chosen in order for products to be listed in the store.
|
9.1 Click button in the Store column; 9.2 Click Refresh Store Categories button to download new categories that have been added on eBay, if any (Fig 9.1); 9.3 Use search field or scroll through the list to find categories; 9.4 Add the categories (max 500 categories) that will be used when listing using this configurator by clicking the green '+' button; 9.5 Tick Default box against the chosen category to set the category as default for items that do not have extended property for eBay category; 9.6 Select Only first category in Option for default categories field, if there is an extended property for eBay store category added to Inventory Items; 9.7 Map extended property for eBay store category with Extended property for first category (Fig 9.2); 9.8 Select Both first and second categories in Option for default categories field, if there are extended properties for two eBay categories (to list items in 2 categories); 9.9 Map extended property for 2nd eBay Store category with Extended property for second category. |
Fig 9.1  Fig 9.2 Fig 9.2 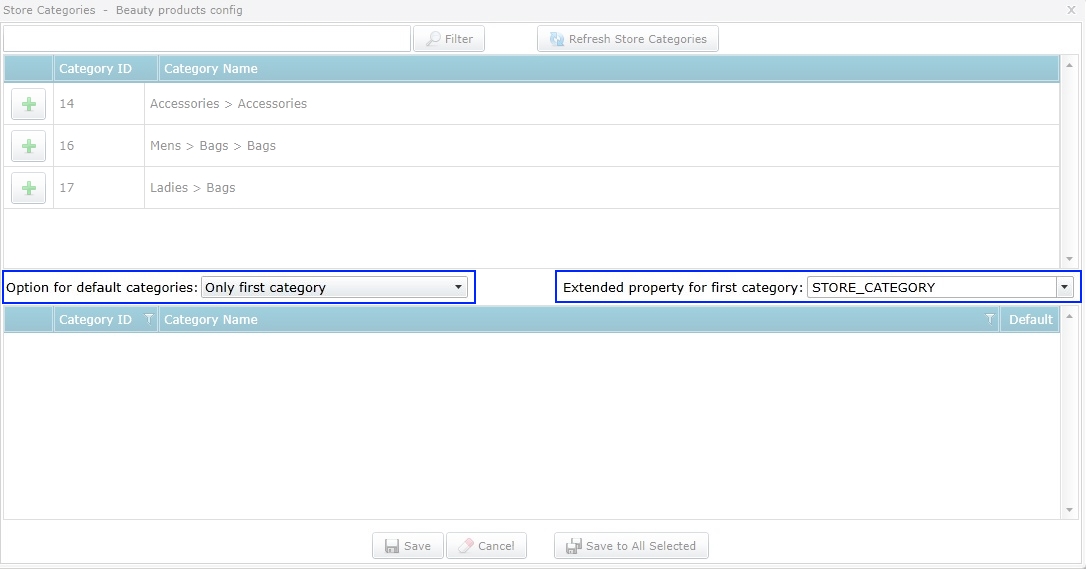 |
10. Fill HTML Template for Listings (Optional)
HTML template is where you define the general look of listings. You can put logo and general information about the listing in the eBay configurator template (returns policy, payment terms etc). There are two modes for HTML template editor: Simple mode and HTML mode. Editor view can be switched under Configs -> Configs ->Ebay (Fig 10.1). Read more about HTML Editor here.
|
10.1 Click button in the HTML Template column; 10.2 Insert text. Use buttons at the top of the editor to format the text, insert images and/or video; 10.3 Click on Properties to insert product tags into the template (Fig 10.2); 10.4 Click on Extended to insert Extended Properties assigned to inventory items into the template (Fig 10.3); 10.5 Click Save. |
Fig 10.1 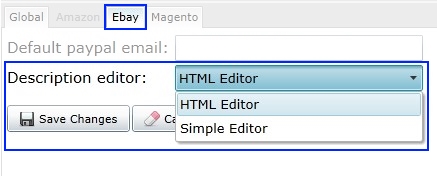 Fig 10.2 Fig 10.2 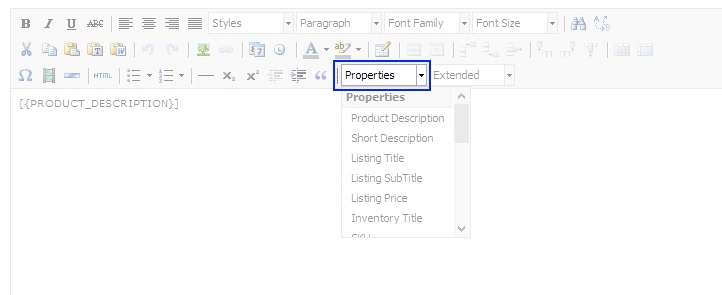 Fig 10.3 Fig 10.3 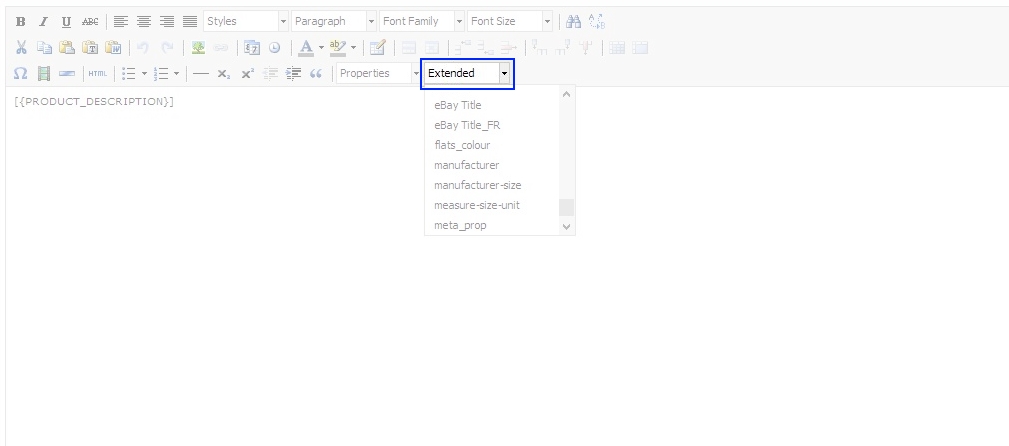 |
11. Save Configurator
|
11.1 Click Save Changes button at the top of the eBay Configurator screen (Fig 11.1); 11.2 Click Yes to the question 'Are you sure you want to save changes?'. |
Fig 11.1 
|
12. Revise Configurator (if required)
If information in the eBay configurator has been changed and needs to be updated on the channel, use the Revise configurator option. During revision each listing associated with the configurator will be updated.
|
12.1 Select the configurator to be revised; 12.2 Click Revise Selected button at the top of the eBay Configurators screen (12.1); 12.3 Review the information about the selected listings (total number of listings to be revised and estimated time for the revision) before revising the listings (Fig 12.2); 12.4 Tick check-boxes against the parameters to be updated on all the selected listings; 12.5 Confirm by clicking Revise button. |
Fig 12.1  Fig 12.2 Fig 12.2 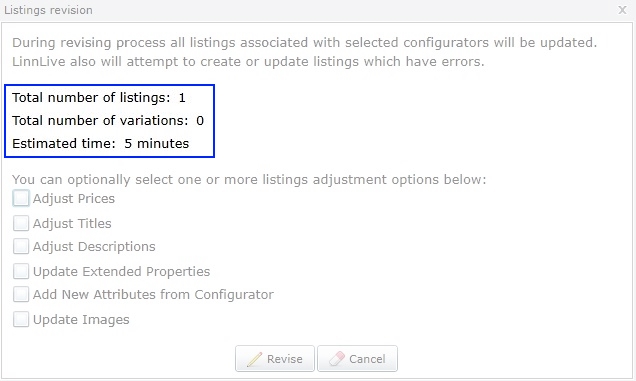 |
13. Duplicate Configurator (if required)
|
LinnLive offers the possibility to duplicate configurators to save time when there is a need to create several identical configurators which differ slightly. E.g. if you need to have identical configurators for fixed price listings and for auction-style listings. Sometimes it is faster to duplicate a configurator and alter it than create a brand new configurator. When duplicated configurator is created, "(0)" is added to the end of the configurator's title. This title can be edited. 13.1 Select the configurator to be duplicated; 13.2 Click Duplicate Selected button at the top of the eBay Configurators screen (13.1); 13.3 Duplicated configurator will appear at the bottom of the eBay Configurators screen (13.2); 13.4 Alter the settings of the configurator; 13.5 Click Save Changes button at the top of the eBay Configurators screen; 13.6 Click Yes to the question 'Are you sure you want to save changes?'. |
Fig 13.1  Fig 13.2 Fig 13.2  |
Videos and Files
The video demonstrates how to list products on eBay from Linnworks inventory. Here we demonstrate very basic concept of listing products in bulk using eBay configurator with a single category and item specifications.
How to specify shipping costs in the extended property for each item individually
This video demonstrates how to include or exclude shipping services offered based on the cost of the product being listed on eBay through linnworks and linnlive
This video demonstrates how to create shipping cost table for products listed on eBay
The video shows how to list multi-variation listings on eBay in LinnLive. We show how to import products, prices, descriptions and attributes for variation products into Linnworks, create eBay configurator for variations and list products to eBay.
This video demonstrates how to create single eBay configurator for multiple categories and list products in LinnLive2 listing management system.